> For the complete documentation index, see [llms.txt](https://docs.inogic.com/llms.txt). Markdown versions of documentation pages are available by appending `.md` to page URLs; this page is available as [Markdown](https://docs.inogic.com/whatsapp4dynamics/chatbot.md).

# ChatBot

**ChatBot** is an **AI-powered conversational assistant** built for Microsoft Dynamics 365 and Dataverse. It helps organizations automate conversations, answer queries using business data, and provide instant support through connected knowledge sources like **Dataverse, SharePoint, websites, uploaded documents, and Azure AI Search.**

It uses both embedding models (for understanding and retrieval) and generative AI models (for response generation) to deliver accurate, contextual, and human-like responses. Businesses can configure agents, knowledge sources, and AI behavior to match their internal processes and communication style.

### Setup & Configuration Steps

Open the ChatBot setup page.

<figure><img src="/files/A58OaCk20G5nGNfhdSX9" alt=""><figcaption></figcaption></figure>

Click on **Create Azure Resources**. This step provisions required Azure services like search, storage, and supporting infrastructure.

<figure><img src="/files/Bft3zbZpKgWIyK1IMDSg" alt=""><figcaption></figcaption></figure>

You will be redirected to the Azure portal. Click **Review + Create** to verify all resource settings before deployment.

<figure><img src="/files/rXV0eeja6vhxiIkByePB" alt=""><figcaption></figcaption></figure>

Click **Create** to start provisioning Azure resources for the chatbot.

<figure><img src="/files/PNcgARqo7GZW4nYGswjl" alt=""><figcaption></figcaption></figure>

Azure begins creating resources. Wait until deployment completes successfully.

<figure><img src="/files/ixLVHRTN4EAHxqmnpv75" alt=""><figcaption></figcaption></figure>

### Azure Configuration & Connection

After deployment is completed, copy the Azure AI Search service details from Azure.

<figure><img src="/files/XAQ9pkFCfL1ZKRy6Vdr3" alt=""><figcaption></figcaption></figure>

Paste these search service details into the ChatBot configuration to connect search indexing.

<figure><img src="/files/Ivize7TPtDrXioIWngW6" alt=""><figcaption></figcaption></figure>

Copy Azure Storage Account details, which will be used for storing chatbot-related files and data.

<figure><img src="/files/9TAP7O0vky8WyA5Djn9x" alt=""><figcaption></figcaption></figure>

Paste the storage details into the ChatBot and click **Validate** to verify the connection.

<figure><img src="/files/qqOcp1MYmvPgbH8FSlBH" alt=""><figcaption></figcaption></figure>

Once validation is successful, the system confirms that Azure services are properly connected.

<figure><img src="/files/9JIFoXTeMEDqnCw0FJsf" alt=""><figcaption></figcaption></figure>

### Security & AI Model Setup

Click on **Manage Security Roles** to define who can access and manage chatbot configurations and agents.

<figure><img src="/files/wGTntc02NJRIC7rZyl8X" alt=""><figcaption></figcaption></figure>

Ensure both required AI models are available:

* **Embedding Model** → used for understanding and retrieving relevant information
* **Generative AI Model** → used for generating responses

<figure><img src="/files/GtFCgpyaEBpEJkWxC53n" alt=""><figcaption></figcaption></figure>

### **Agent Creation**

Click **New AI Agent** to create a chatbot instance. Each agent can have its own behavior and knowledge base.

<figure><img src="/files/DQTBNryMHEjuGldBKc4O" alt=""><figcaption></figcaption></figure>

The agent configuration form opens where all settings are defined.

<figure><img src="/files/1UoCafrmq0RaCcTLuybk" alt=""><figcaption></figcaption></figure>

Enter agent name and details. Click **Enhance** to automatically improve or refine the system prompt for better AI responses.

<figure><img src="/files/Zml5pU4FO1k8qWoazRk7" alt=""><figcaption></figcaption></figure>

### AI Model Configuration

Go to the **AI Models** tab where AI behavior is configured.

<figure><img src="/files/VhVj3CuV66j5o4lfT6yW" alt=""><figcaption></figcaption></figure>

Select an existing AI model or create a new one and save it for use.

<figure><img src="/files/4nSf1blLjNqhmc9Q6yxG" alt=""><figcaption></figcaption></figure>

Choose the **WhatsApp4Dynamics configuration** from the dropdown to link chatbot with CRM context.

<figure><img src="/files/Rqp4aVgPy66oNOnmSQA0" alt=""><figcaption></figcaption></figure>

Use the preview option to test how the chatbot responds before publishing it live.

<figure><img src="/files/T4K13I6S1B6shFaDS5qj" alt=""><figcaption></figcaption></figure>

### Knowledge Source Setup

Click **Add Knowledge Sources** to connect data sources that the chatbot will use for answering questions.

<figure><img src="/files/9teCUNbv50Vo92c3pyh1" alt=""><figcaption></figcaption></figure>

You can choose from multiple source types such as websites, SharePoint, or Dataverse.

<figure><img src="/files/7huM3lCFIPOcT1TPPKfK" alt=""><figcaption></figcaption></figure>

### **File Upload Knowledge Source**

Click **Upload File** to add documents like PDFs, Word files, or Excel sheets.

<figure><img src="/files/SfTXO8YdEpnS0j09th75" alt=""><figcaption></figcaption></figure>

Select the required file from your system and upload it into the chatbot.

<figure><img src="/files/Isth6Nh3LCLkKCdgOnLP" alt=""><figcaption></figcaption></figure>

The system automatically processes the file and creates a searchable knowledge source.

<figure><img src="/files/QOjP7xrQzuDFtuLjuOIJ" alt=""><figcaption></figcaption></figure>

You can remove existing files or add new ones whenever needed.

<figure><img src="/files/PSfUlDYUDTtZLlDY11J9" alt=""><figcaption></figcaption></figure>

Upload additional files and click **Upload and Process** so the system indexes the content for AI retrieval.

<figure><img src="/files/YHzzaDAqMcc72rO1K9il" alt=""><figcaption></figcaption></figure>

### **Website Knowledge Source**

Choose **Public Website** as a knowledge source.

<figure><img src="/files/mMIgd6c3vDJ7pesc8Fic" alt=""><figcaption></figcaption></figure>

A configuration pop-up appears to enter website details.

<figure><img src="/files/qJetE0IoHFdZ7nrrGywW" alt=""><figcaption></figcaption></figure>

Paste the website URL and click **Add** to include it.

<figure><img src="/files/C4R8xZHGTt8YdKm0QgIu" alt=""><figcaption></figcaption></figure>

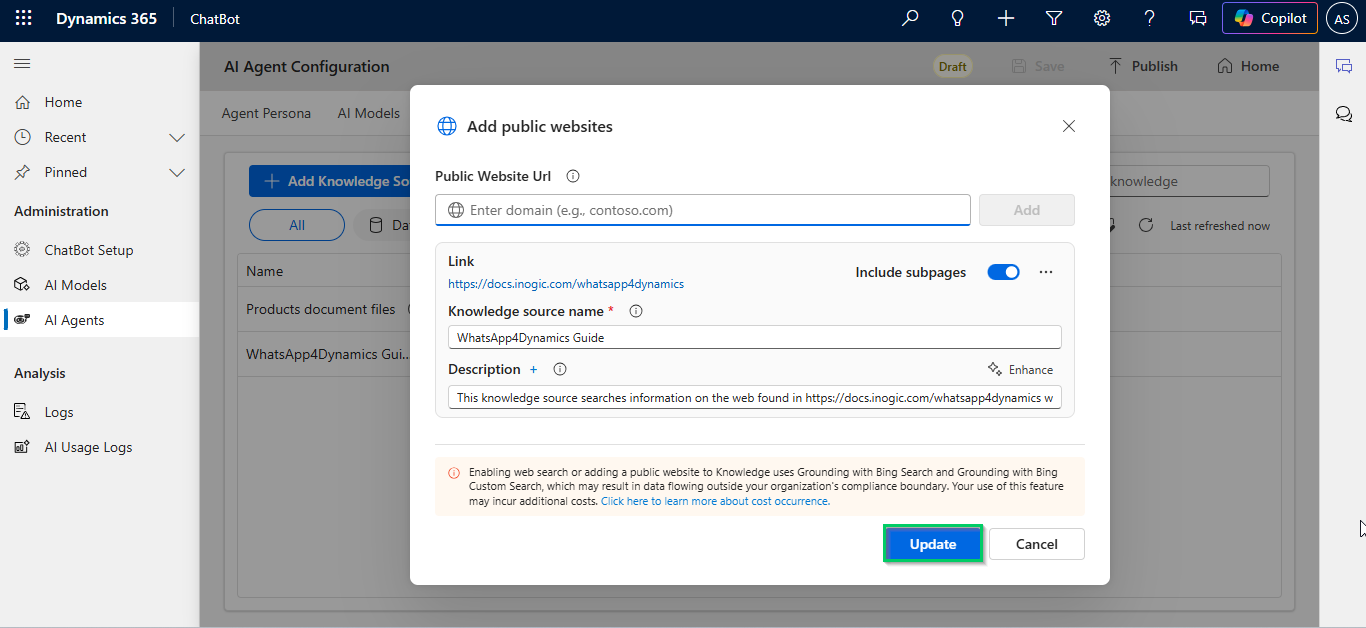
Enable **Include Subpages** if you want the chatbot to also read linked pages, then click **Add to Agent**.

<figure><img src="/files/VofxQ2XlybU80aEijNCU" alt=""><figcaption></figcaption></figure>

You can later edit, remove, or enhance the description of the website source.

<figure><img src="/files/kFQ2iWMnxLyYQ331I0J6" alt=""><figcaption></figcaption></figure>

You can add multiple websites and update the agent knowledge anytime.

<figure><img src="/files/JSGGqeirkup15TgtN8Yj" alt=""><figcaption></figcaption></figure>

### **SharePoint Knowledge Source**

Choose SharePoint as a knowledge source for internal documents.

<figure><img src="/files/dZLex7YmVuAG7eW9ra98" alt=""><figcaption></figcaption></figure>

Popup will open. Enter a name for this SharePoint source.

<figure><img src="/files/Q3JrKvipthEWxffzOF0F" alt=""><figcaption></figcaption></figure>

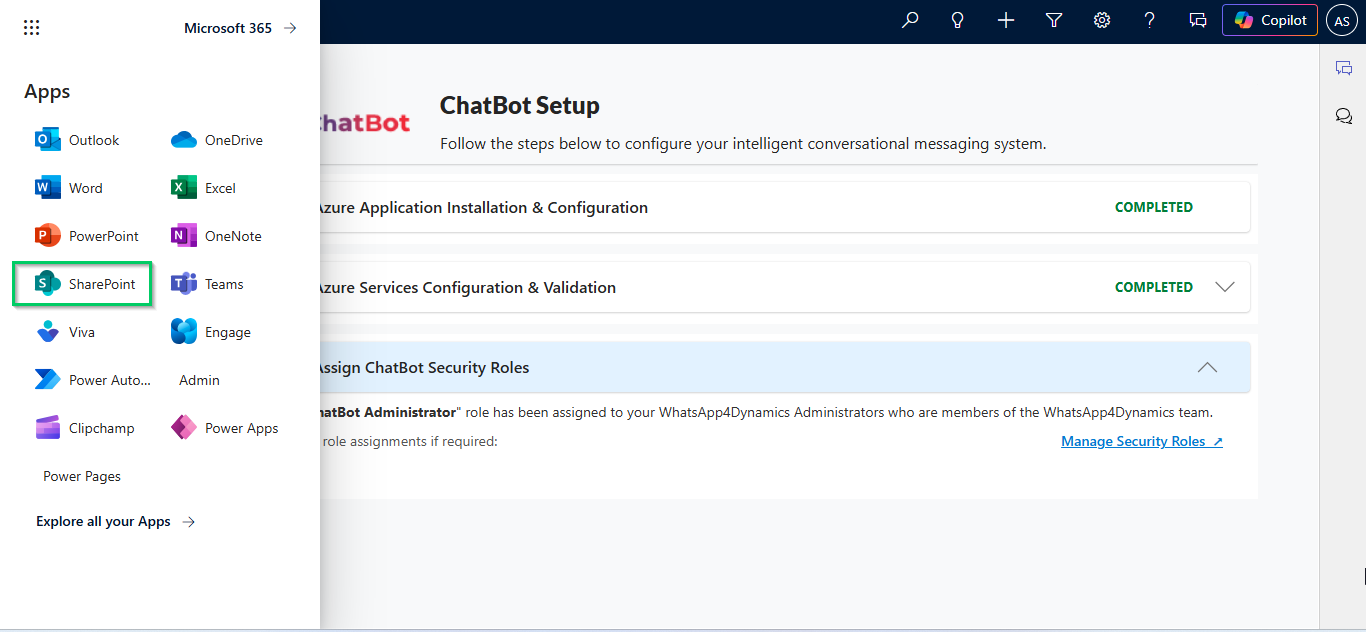
Open SharePoint and copy the site URL from the browser.

<figure><img src="/files/ofH551OROgvbieLDQVl9" alt=""><figcaption></figcaption></figure>

Choose the relevant chatbot-related SharePoint site.

Copy the full site URL from the browser address bar.

<figure><img src="/files/zN1XjbBVgI9nusELZep7" alt=""><figcaption></figcaption></figure>

Paste the SharePoint URL into chatbot configuration.

<figure><img src="/files/5p2ilspdmXN7Bi0tfQBl" alt=""><figcaption></figcaption></figure>

Select the appropriate container type for storing and organizing data.

<figure><img src="/files/MPkL64oTQy9418lCsXyx" alt=""><figcaption></figcaption></figure>

### **Azure App Registration Setup**

Go to Azure Portal and open **App Registrations**.

<figure><img src="/files/sBHXJ1gH0MmgmM3Br0WV" alt=""><figcaption></figcaption></figure>

Find the required registered application and open it.

<figure><img src="/files/cfqviLEt0kOPWL5DzQOs" alt=""><figcaption></figcaption></figure>

Copy the **Application (Client) ID** from Azure.

<figure><img src="/files/y9m4PNwov8uhBC7p1mjH" alt=""><figcaption></figcaption></figure>

Paste it into the chatbot configuration.

<figure><img src="/files/0wnitxGB5SUy3kQprFsI" alt=""><figcaption></figcaption></figure>

&#x20;Copy the client secret key from Azure.

<figure><img src="/files/mjgLpYPgeaOS0B3C7mlp" alt=""><figcaption></figcaption></figure>

Paste the key into the chatbot and click **Add to Agent** to connect Azure authentication.

<figure><img src="/files/kLheHEEl5Y42qTNrF2nu" alt=""><figcaption></figcaption></figure>

### **Dataverse Knowledge Source**

Choose Dataverse as a knowledge source to use CRM data.

<figure><img src="/files/aFYIKDjzakG22oD5xtDy" alt=""><figcaption></figcaption></figure>

Select the required entity and give a meaningful name to the knowledge source.

<figure><img src="/files/8upyNVhLH1zHqBEXW8d2" alt=""><figcaption></figcaption></figure>

Choose which entity fields should be used for chatbot search and responses.

<figure><img src="/files/wK1FIhHGsspqJScQE9WG" alt=""><figcaption></figcaption></figure>

Select the field that uniquely identifies customers (like phone).

<figure><img src="/files/Tr6XTn07AmyEyjpS2GpG" alt=""><figcaption></figcaption></figure>

Confirm selections and click **Add to Agent** to connect Dataverse data.

<figure><img src="/files/cDG7WsBRxZr01zMIIhTP" alt=""><figcaption></figcaption></figure>

### **Publishing Agent**

Click **Publish** to make the chatbot live and available for users.

<figure><img src="/files/MoGrCojPuhSPZYXMsuPE" alt=""><figcaption></figcaption></figure>

System confirms that the agent has been successfully published.

<figure><img src="/files/ipAVE9V6Oll3LijRaBsq" alt=""><figcaption></figcaption></figure>

### Agent Management

You can edit the agent anytime, which moves it back to draft mode for updates.

<figure><img src="/files/8cNp0IHJyG6ZeYPgnykR" alt=""><figcaption></figcaption></figure>

All created agents are visible in a grid view where they can be managed, edited, or monitored.

<figure><img src="/files/q9X4bGsvv73DMG7jxJDh" alt=""><figcaption></figcaption></figure>